Monthly Archives: January 2017

Stromboli

Do you do anything for Super Bowl Sunday?  Around here, we celebrate it as if it were a holiday.  My husband would take the kids out to do the grocery shopping.  Have I ever told you that my husband would always do the grocery shopping?  He wasn’t always good at it. It was hard for him to remember that a soft eggplant is too ripe but a hard peach is too green.  He wasn’t much interested in fruits or vegetables but come Super Bowl Sunday he would go all out.  So the kids loved it as they would go aisle after aisle tossing in the cart whatever suited their fancy.  There were no restrictions.  All the treats that were usually not available at the house were invited to watch the football game with us.  Sometimes we would have human guests and sometimes not.  We never had a big T.V. but people would still come over to watch the game and celebrate it with us.

Now, I’m not much of a football fanatic.  In fact, I don’t follow it at all but I like having people over.  After a 40 hour work week and cleaning the house for guests, it’s always really hard for me to prepare food.  I’m usually exhausted.  That’s why I’m always looking for make ahead recipes for company.  If you have been following me for a while, I’m sure you have gathered that I like to cook from scratch.  I’m not one for processed foods.  It can be an arduous task to make everything from fresh and good ingredients.  Super Bowl Sunday is not a day for that.  The house is usually full of processed foods already.  I like to make Make-Ahead Pizza Rolls with store bought dough, which makes it so much faster and convenient.  The recipe is on the blog just search for it.  This recipe is also a roll but more like a sandwich.  It uses store bought bread dough.  You could substitute it for homemade if you have the time.  I use the traditional fillings of mozzarella, ham and salami but you could change that to suit your taste.  Make this a few days ahead, wrap it in foil and refrigerate it.  Then stick it in an 350º oven for 15-20 minutes to reheat.  Or spend 20 minutes the day of and bake for 30 minutes and serve.

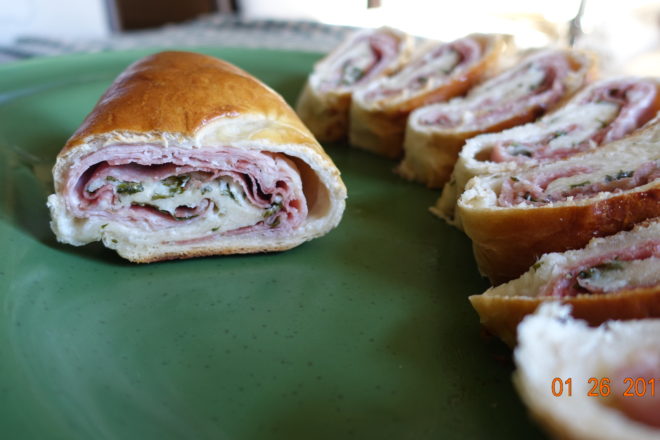
It’s fun and easy.  You make 12 servings with this recipe.  All you do is roll up the ingredients in the two loaves of bread and bake.  Then it’s TA-DA!  Sandwiches for everyone.  It’s yummy and fun to eat.

Ingredients

2 – 1lb. loaves Frozen White Bread Dough (I used Bridgford), thaw according to directions

1 1/2 cups shredded Mozzarella Cheese

8 oz. thinly sliced Ham

8 oz. thinly sliced Salami

1/2 cup chopped Parsley

1 Egg for egg wash


Preheat oven to 375 degrees.  Line a cookie or jelly roll sheet with parchment paper. If you have never worked with parchment paper, check out my tips on the Celebration Cake post.  I used a silpat.  Coat with non-stick spray.  (No need if you are using a silpat.)

On a lightly floured surface, roll out one Bread Dough Loaf into a 14 x 10 inch rectangle.

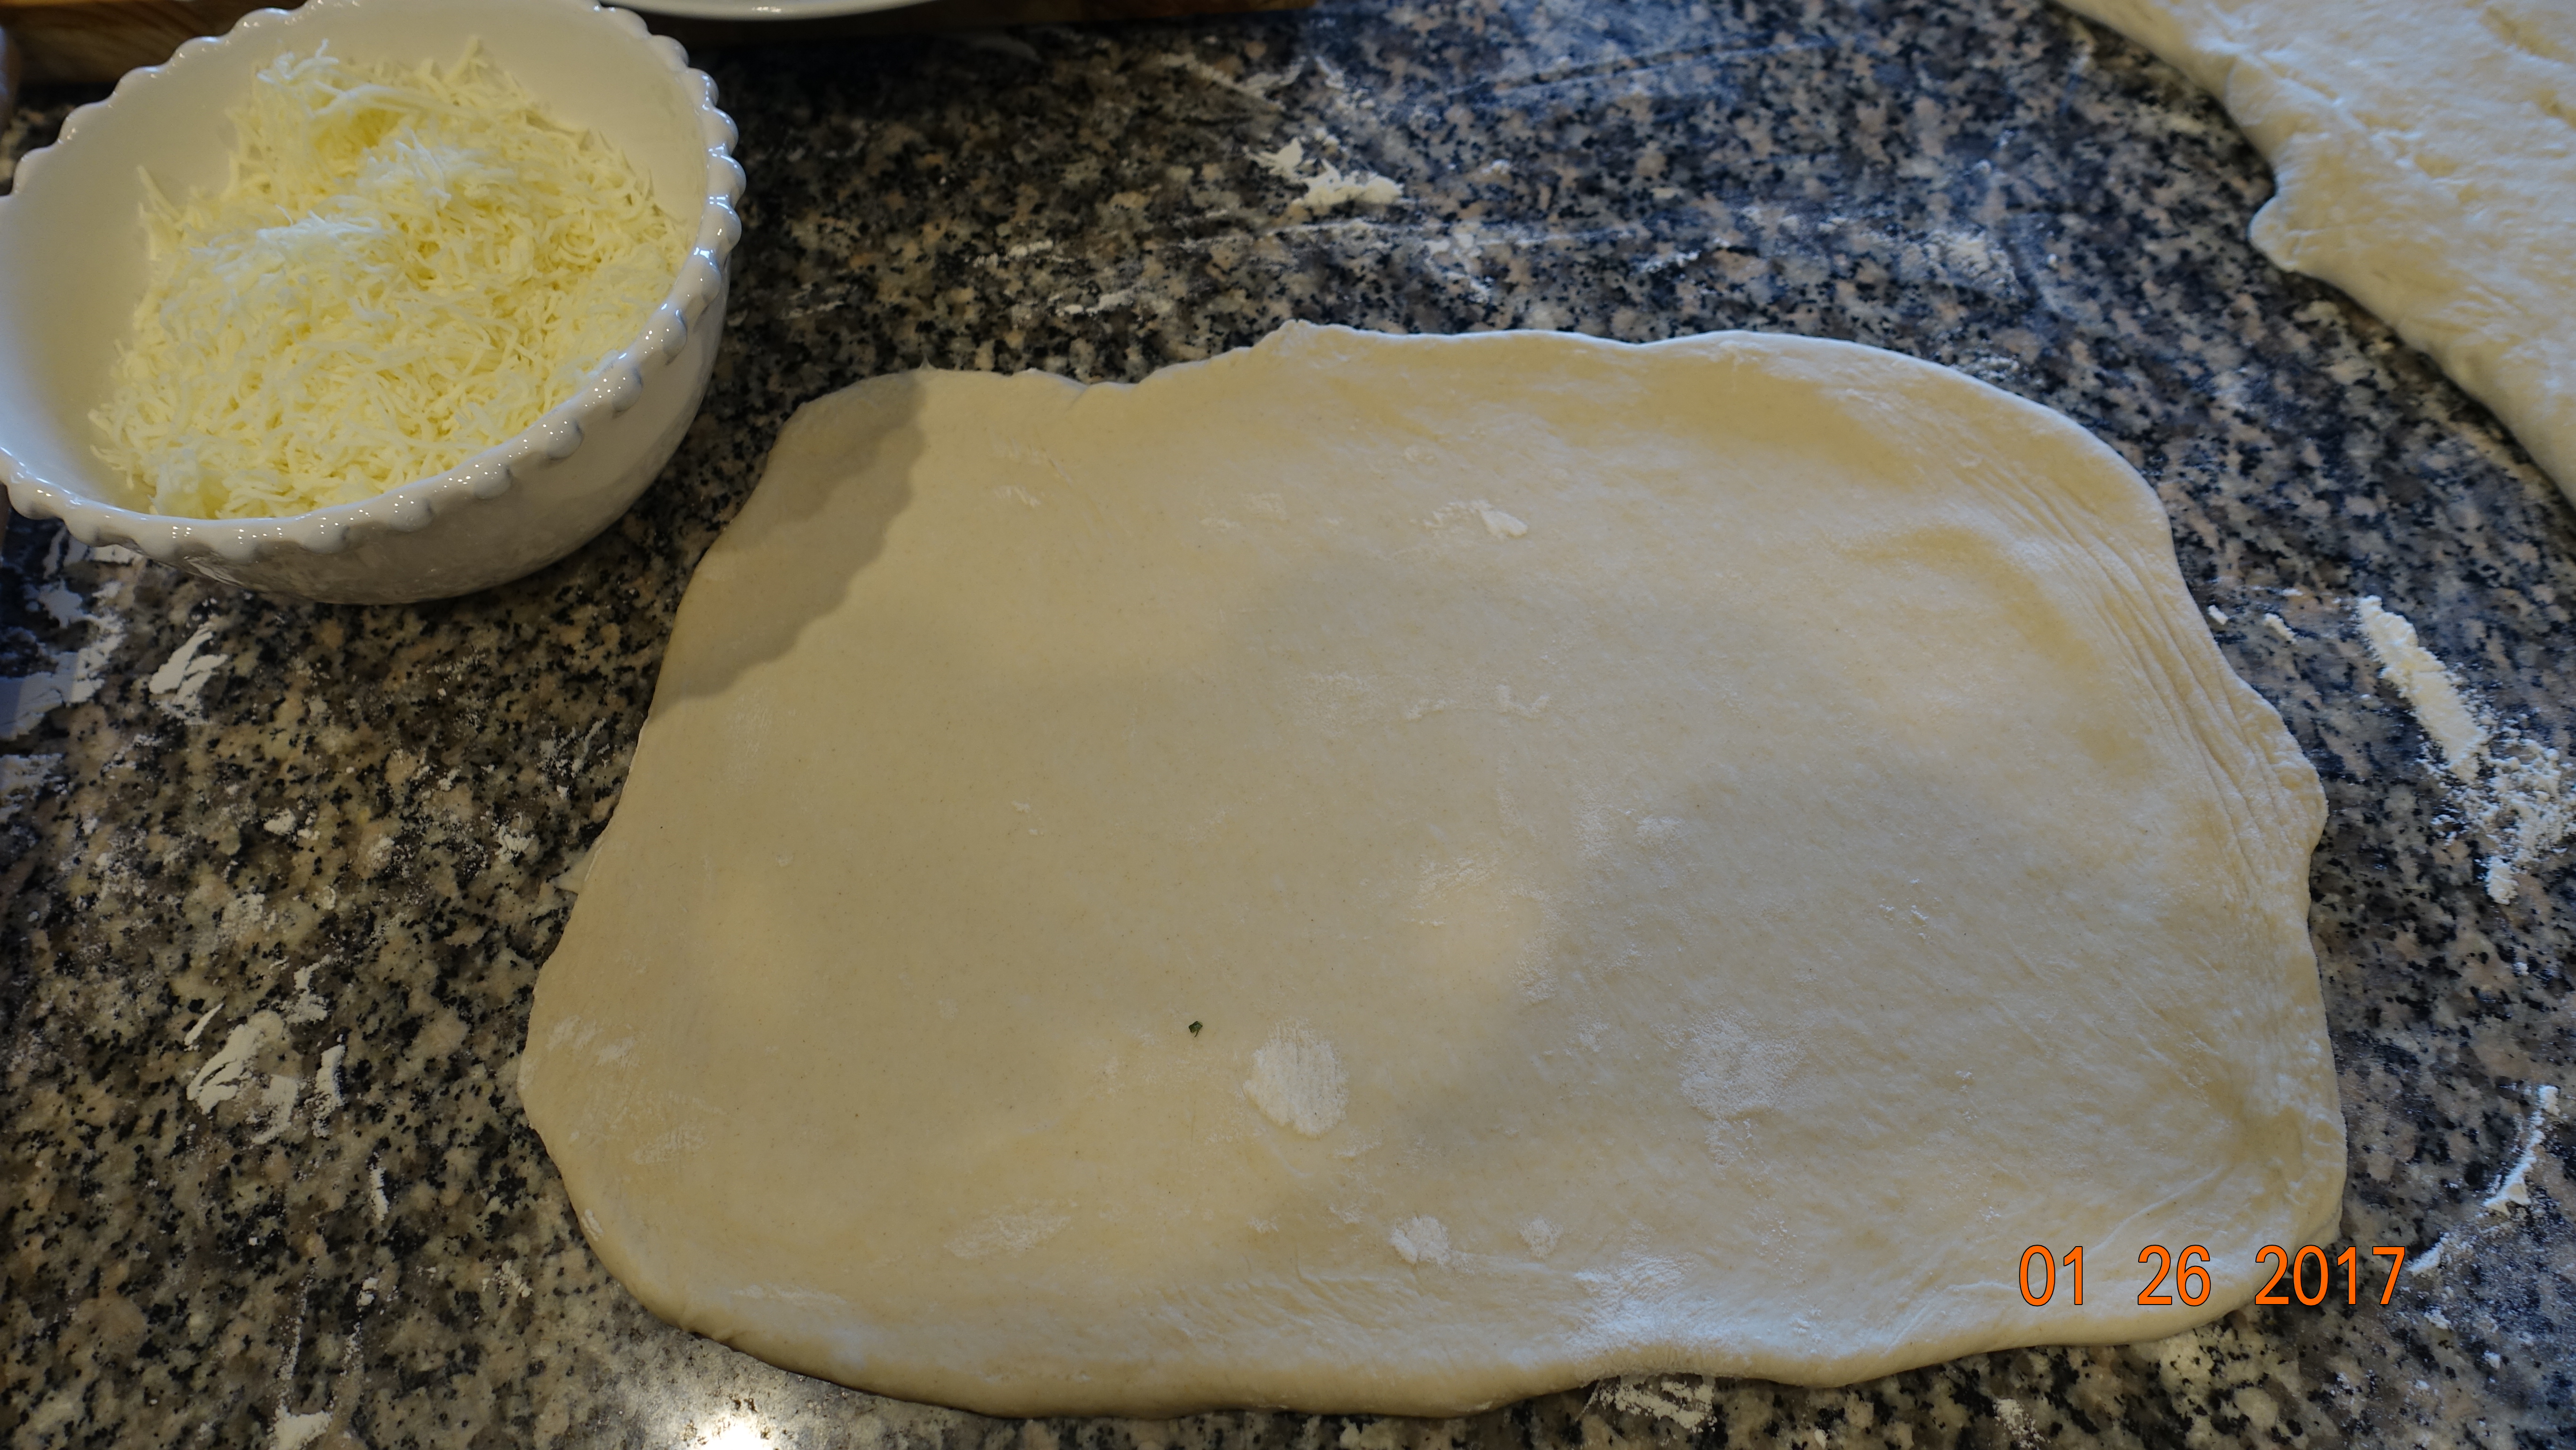
Sprinkle Dough with 1/4 cup Mozzarella, leaving 1/2 inch border all around.

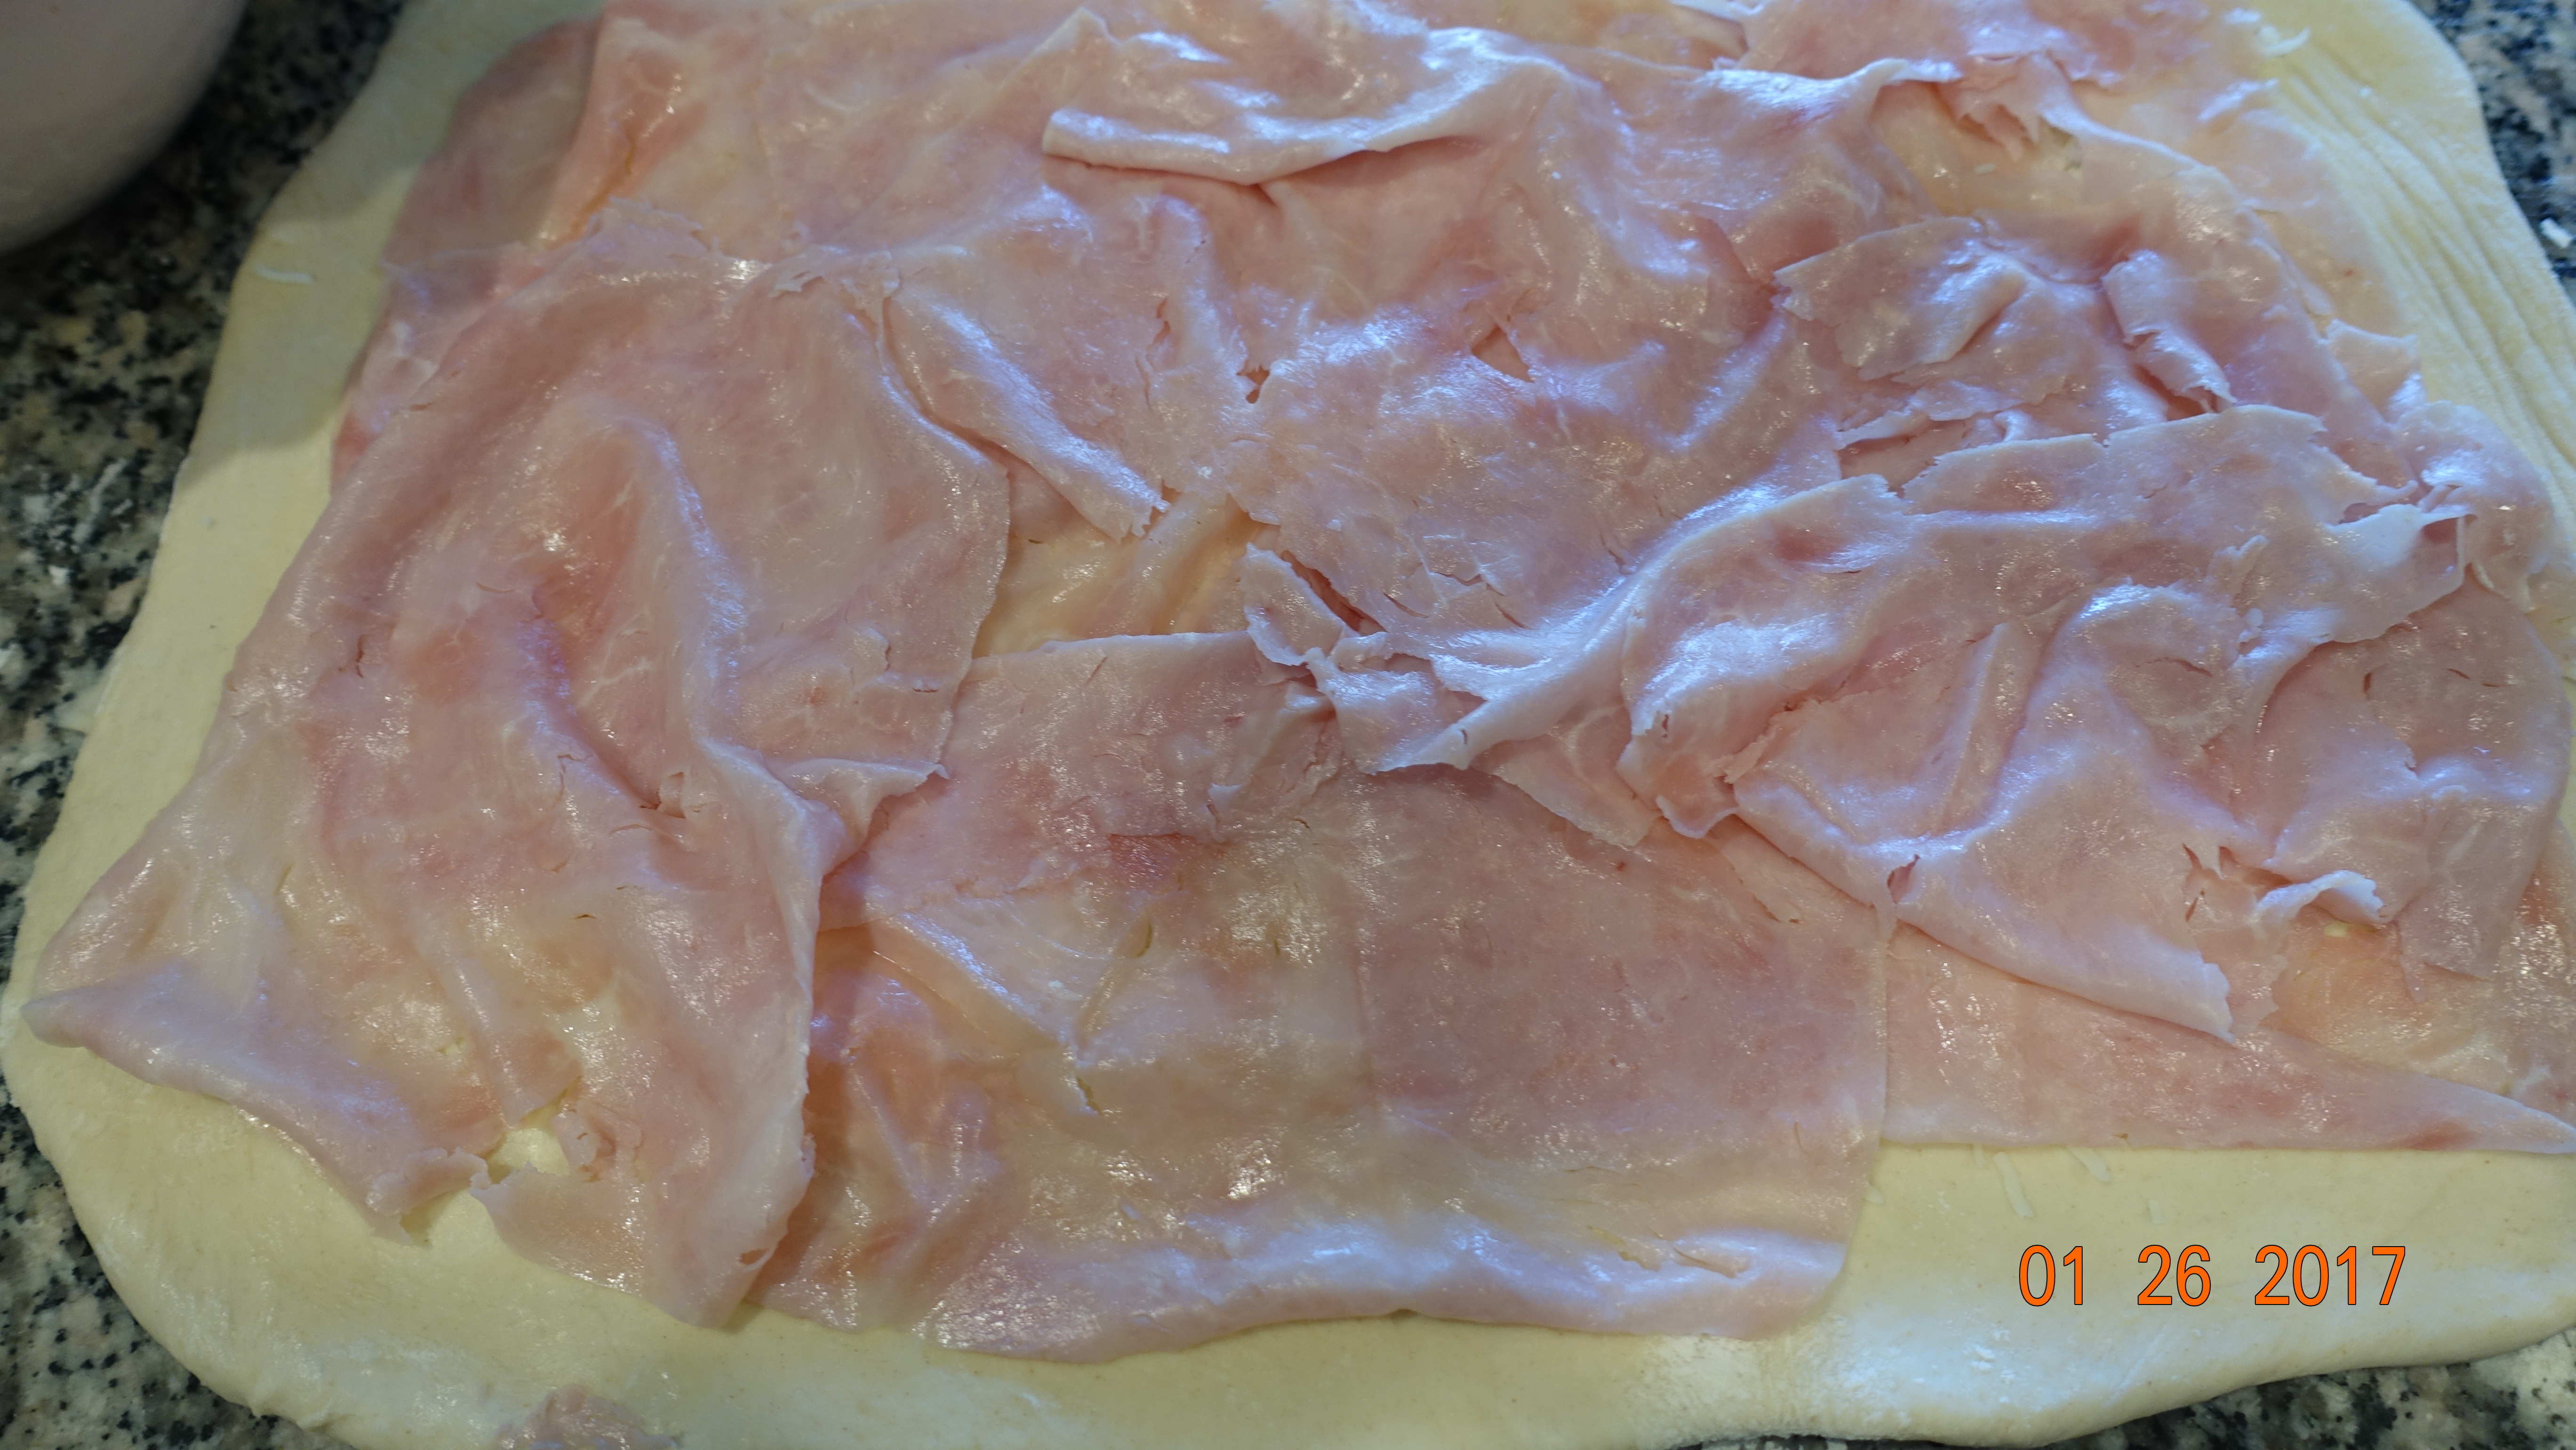
Layer 1/2 of the Ham slices overlapping, still leaving the 1/2 inch border.

Top with another 1/4 cup Mozzarella.  Layer 1/2 of the Salami slices overlapping.

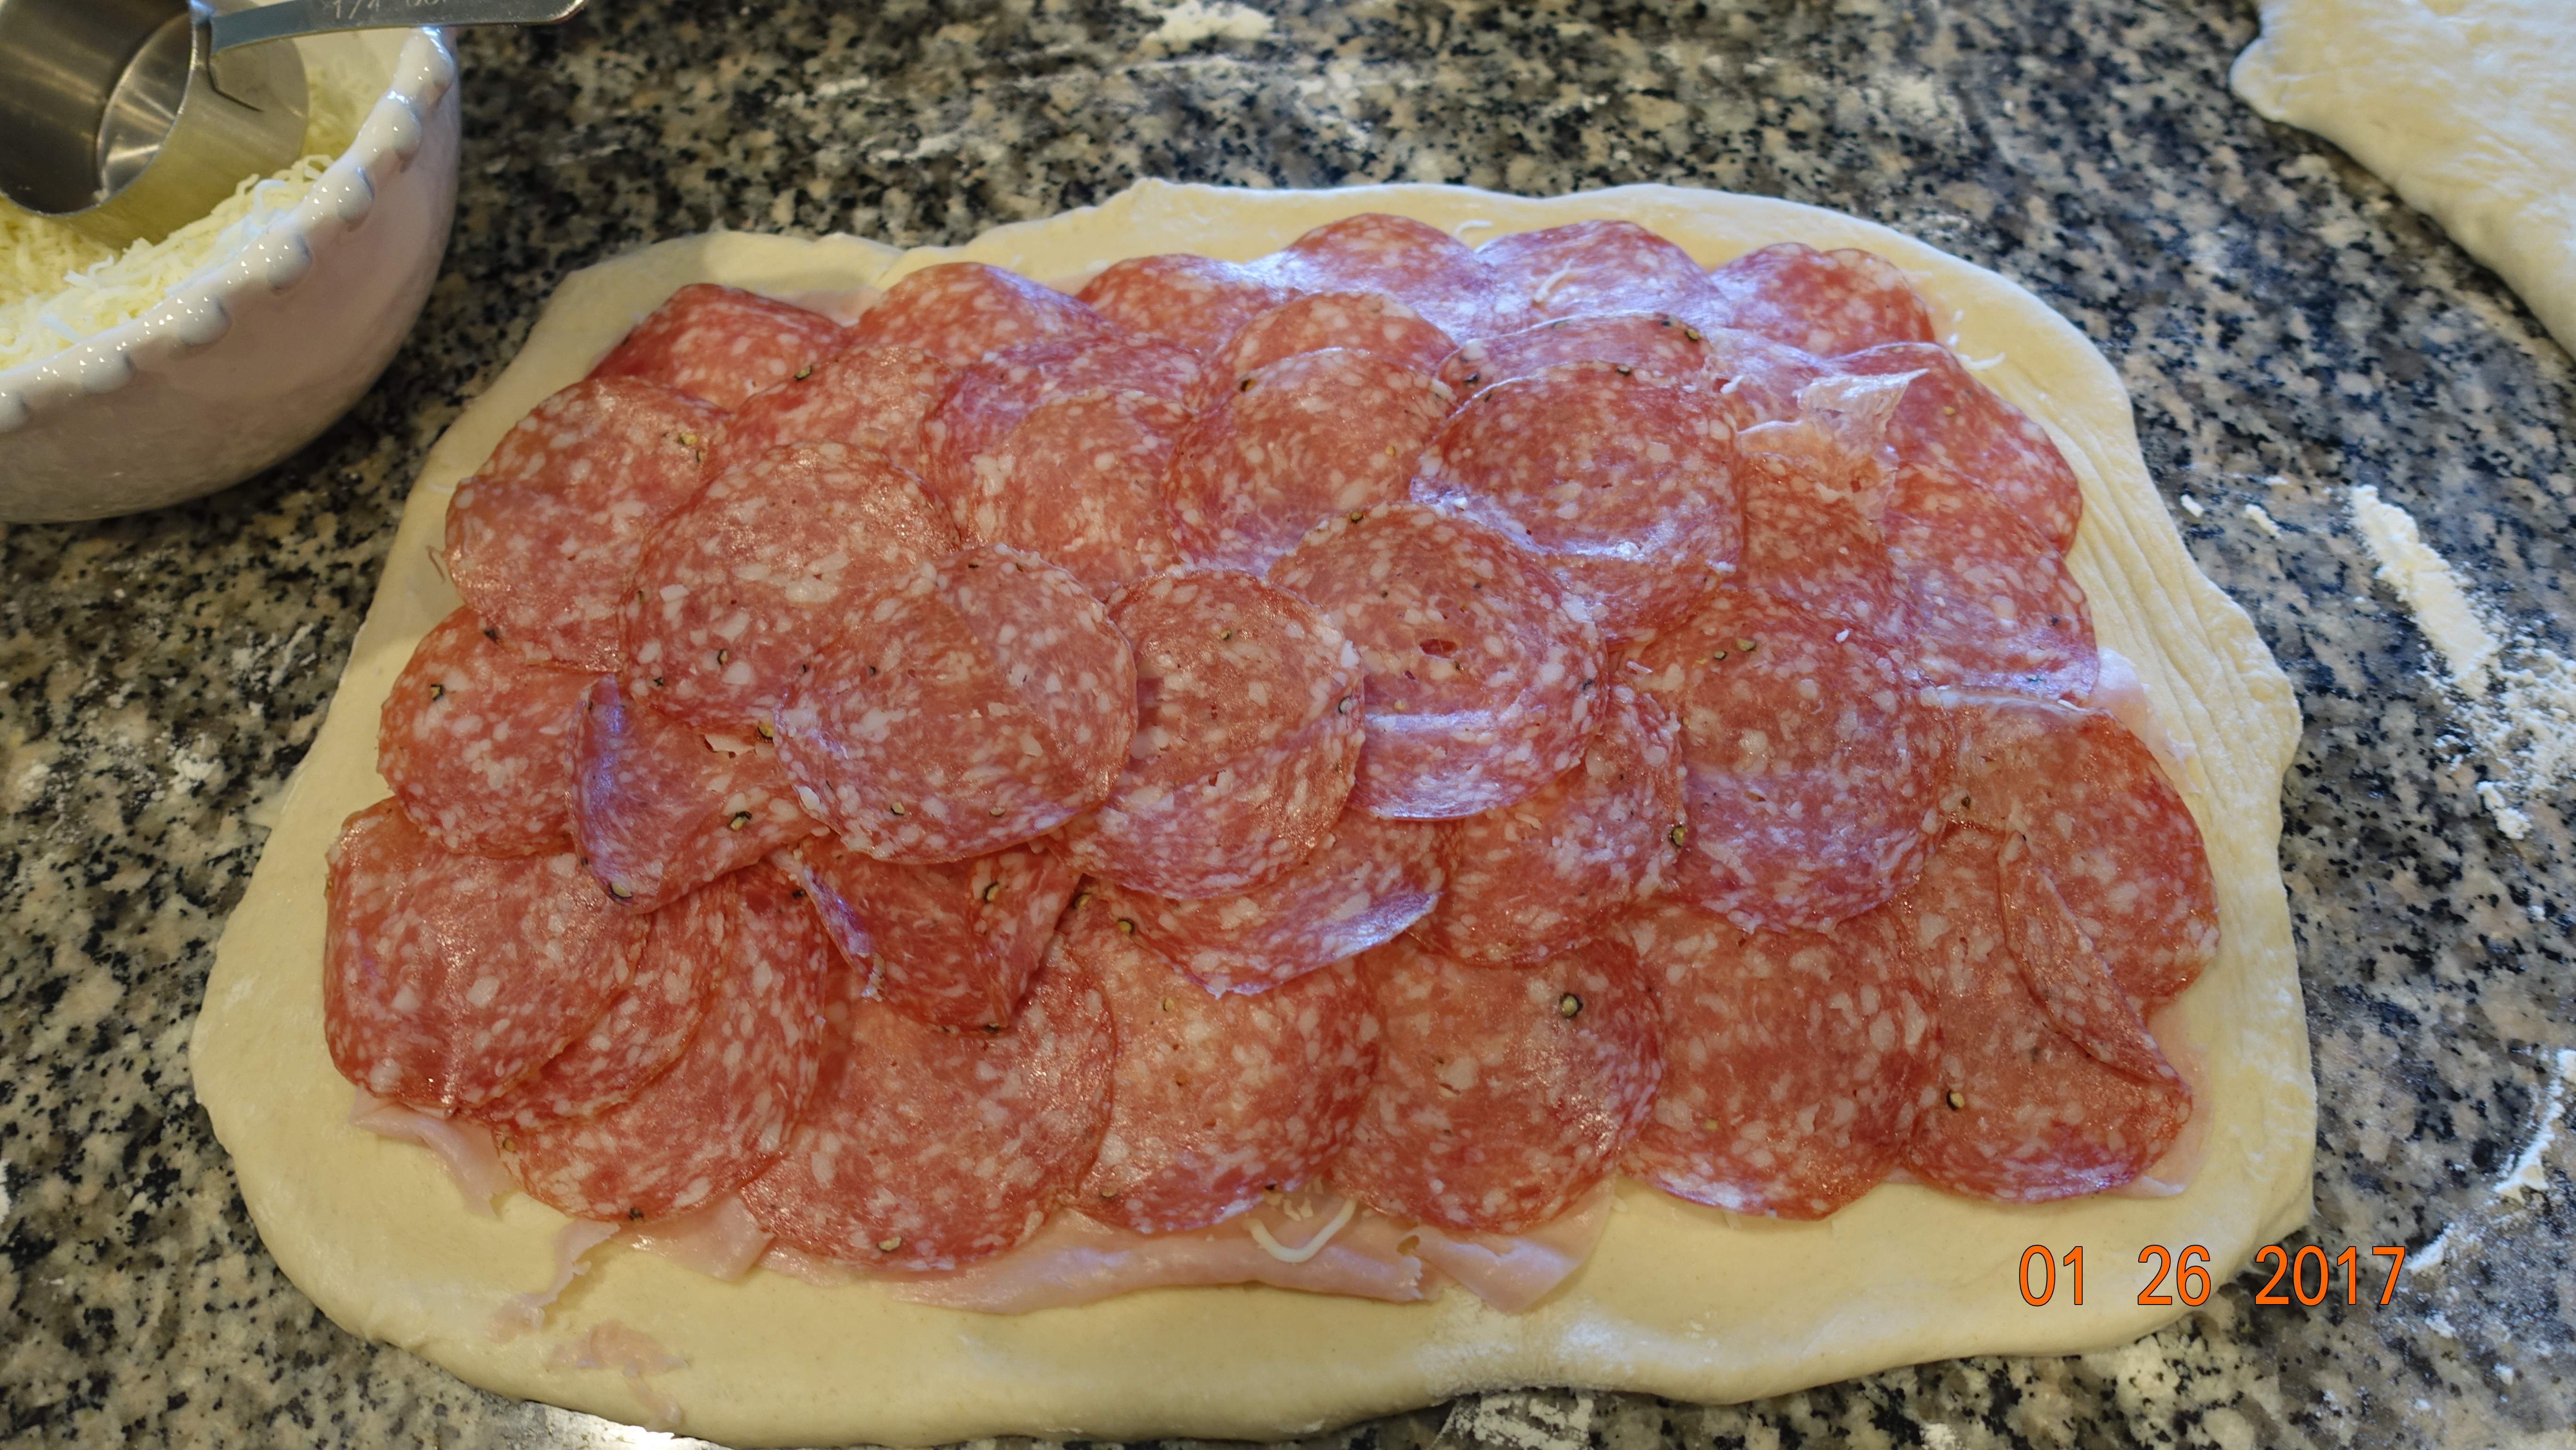
Press gently.  Sprinkle 1/2 of the Parsley and 1/4 cup Mozzarella.

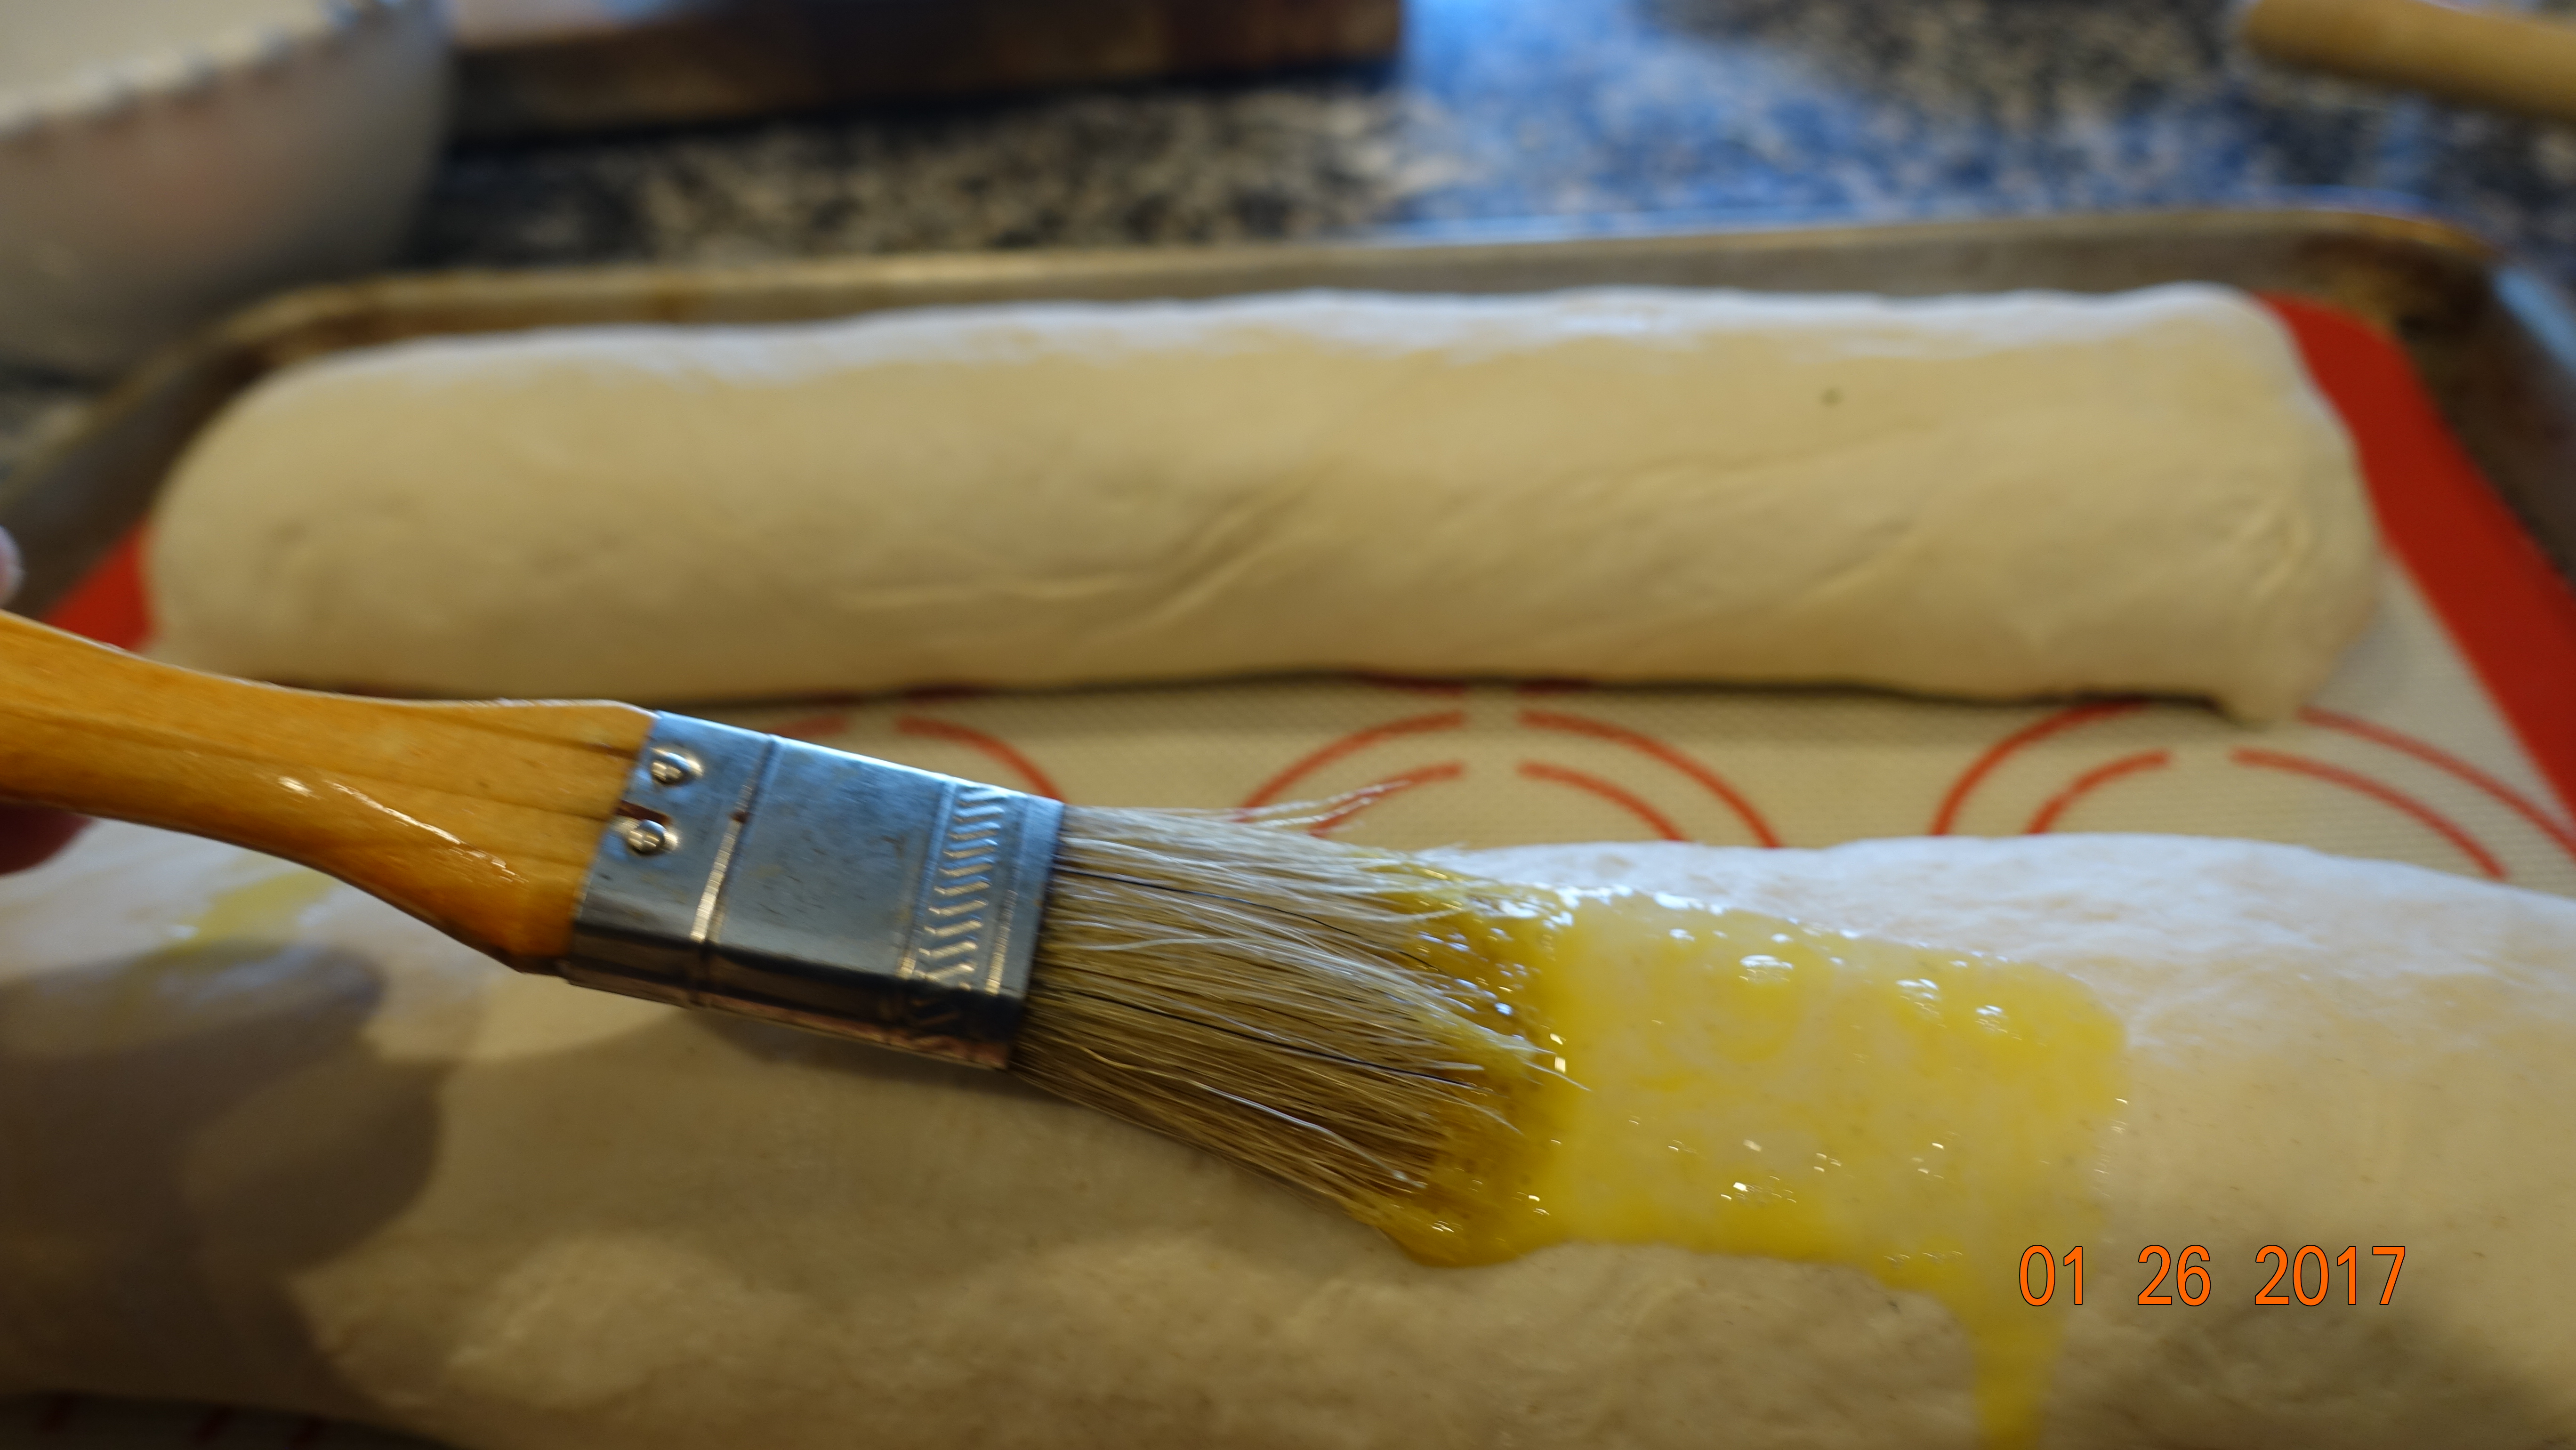
Tightly roll up from the long side.  Pinch the seams and ends to seal.  Place on the baking sheet seam side down.  Repeat with the second loaf.  Place 4 inches apart.  Brush with egg wash consisting of 1 Egg and 1 tsp. Water slightly beaten.  Cut 3 slits on top of each loaf.

Bake for 30 minutes or until tops are brown.  Let cool. Slice and serve warm.


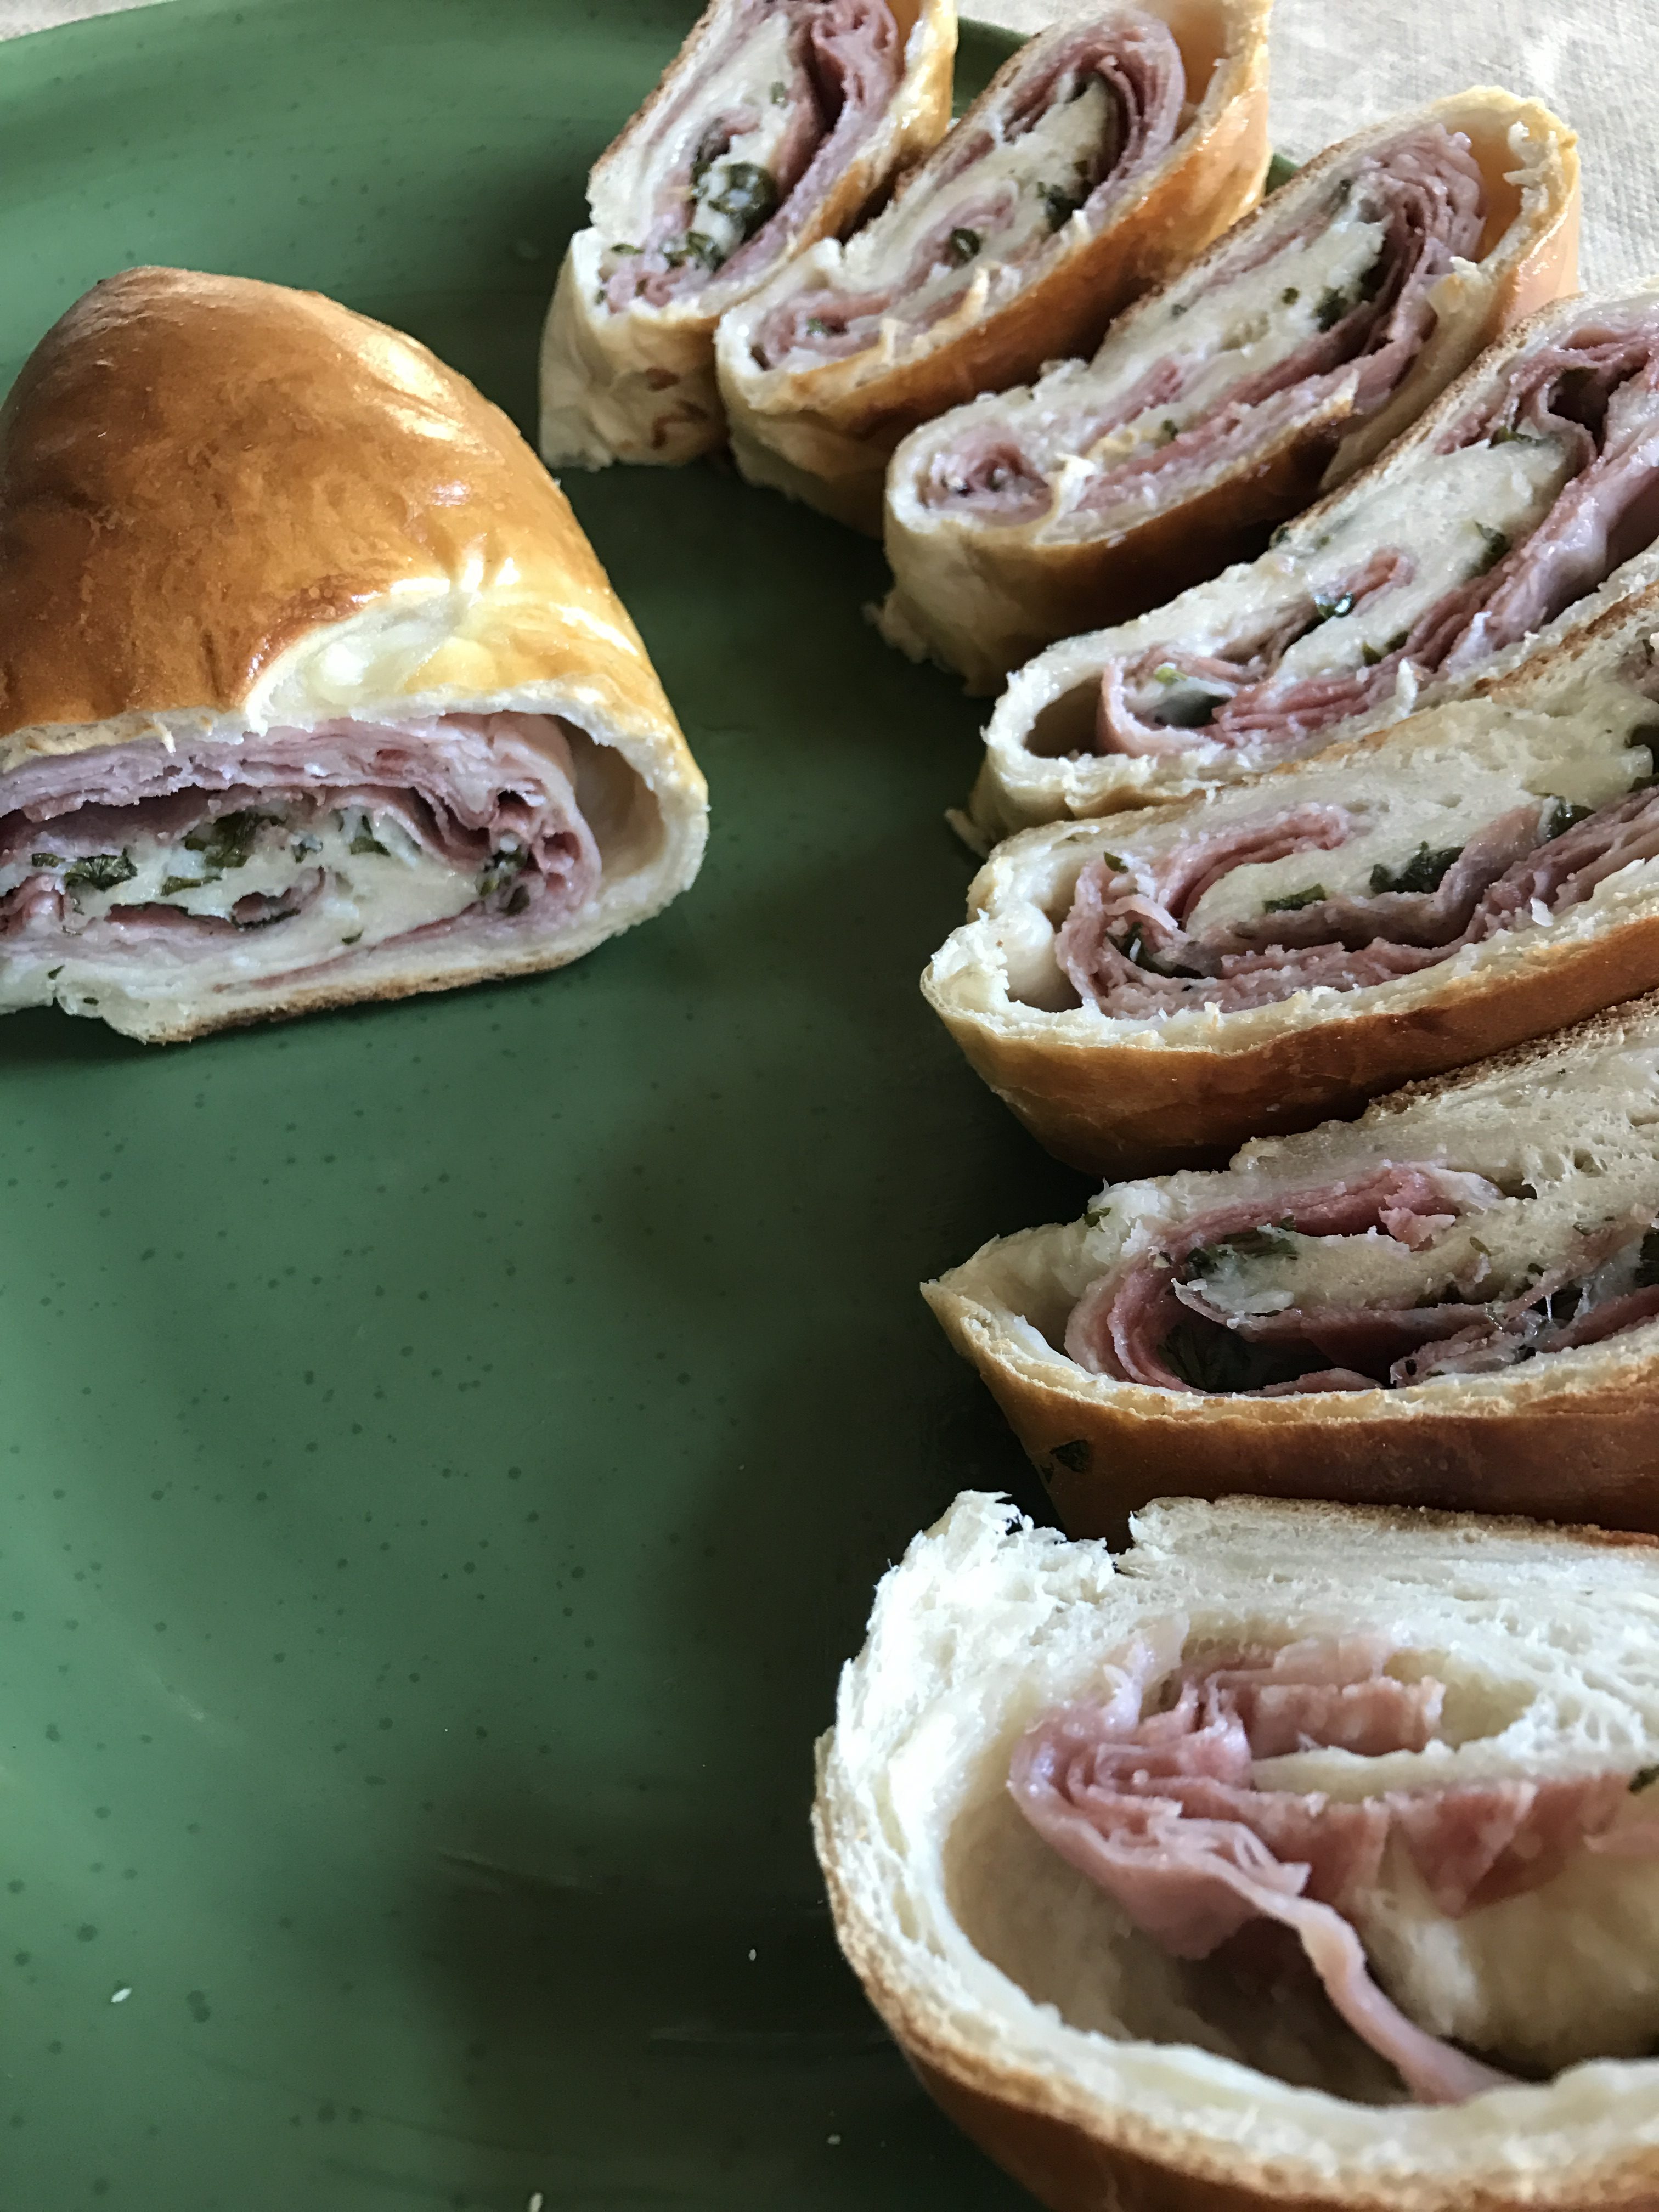
Each serving contains 361 Calories, 17g. Protein, 37g. Carbs, 2g. fiber, 16g. Fat.

Eat well, drink well, and live well.  Until next time.


Celebration Cake

Celebrations are the landmarks of our lives.  A celebration can mean different things to different people.  For me, it has to include friends and family, food and cake.  This is my Go-To Birthday cake.  It is deliciously dense.   I found this recipe on themodernproper.com.  It’s a great website.  You should check it out.

I had a comment on a Facebook post recently from a woman who never used olive oil for sweet recipes.  I like olive oil in cakes and brownies because it creates such a moist and rich dessert.  Remember that you can substitute the butter for olive oil at a 1 to 2/3 ratio.  In other words, if it asks for 1 tablespoon of butter, use 2/3 tablespoon of olive oil.  I suggest that you substitute all your recipes that use any other oil for olive oil, even coconut oil unless you are seeking that coconut taste.  Make sure you use unrefined coconut oil.  Remember that any oil that is refined has been processed with heat and/or chemicals.  That’s not the case with olive oil.  Please make sure that your olive oil is fresh.  Smell it, taste it, make sure it isn’t rancid or you will taste the rancidity in your baked goods.  Check the date on the bottle.  Does it have a harvest date or a best used by date?  More importantly, how long have you had it opened?  Longer than three months?  Six months?  It might be rancid after three.  It will probably be rancid after six.  It might be rancid right from the store shelf!  YES, that’s right, straight from the market.  Don’t worry if your oil is a robust and strong olive oil.  If it is fresh, it will not flavor your recipe.

I don’t recommend substituting olive oil in baking mixes.  Those boxes of cake and brownie mixes take on the olive oil flavor sometimes.  Really, baking a cake or brownies from scratch is not that much more work and the results are definitely worth it.

Talking about work, this recipe is a little more complex than your average cake.  This is a naked cake and so it has very little frosting on the side. It has some really good for you ingredients.  Notice I didn’t say healthy.  That word is so over used plus this is a cake, so you know where I’m headed with that.  The ingredients include Olive Oil, Yogurt, Pistachios, and Lemon.  All good for you ingredients.  I used my homemade Yogurt in the pictured cake but if you buy a commercial yogurt, make sure you check the ingredients.  Many of the Greek-style yogurts have gelatin and other unnecessary ingredients.

If you have never worked with parchment paper, I have some tips below.

Let me know how it went.  Leave a comment below.

Ingredients

**You will need three 8-inch round cake pans.**

1 cup unsalted, shelled Pistachios

2 cups Cake Flour

(I did’t have any in my pantry, so I used Bread Flour instead.)

4 tsp. Baking Powder

2 tsp. Ground Cardamom

1/2 tsp. Salt

2 cups Sugar

1 cup Olive Oil

1/2 tsp. Vanilla

1 cup Plain Greek Yogurt

6 large Eggs

2 Tbsp. finely grated Lemon Zest

Lemon Butter Cream Frosting

1 cup Butter

3-4 Tbsp. Lemon Juice, freshly squeezed

1/2 tsp. Vanilla Extract

3 cups Confectioners’ Sugar

Preheat oven to 350 degrees.  Butter and dust with Flour the bottom and sides of three 8-inch round cake pans lined with parchment paper. (See TIPS below.)

Pulse in a food processor the Pistachios until finely ground for about 1 minute.

Add Flour, Baking Powder, Cardamom, and Salt.  Pulse a few times to combine.

In a large bowl, mix Sugar, Olive Oil, Vanilla, Eggs, Yogurt and Lemon Zest until well incorporated.

Mix in the dry ingredients.

Pour batter evenly into the pans and bake until a wooden skewer inserted in the center comes out clean, 30-40 minutes.  Cool in pan on a rack for 10 minutes.

For FROSTING, beat all the ingredients until light and fluffy.


Once the cakes have cooled, run a knife around the cake to loosen and invert onto a rack.

Remove parchment paper and level out the tops of each cake by slicing with a serrated knife.  (I passed on the last line.  I would eat all the shavings plus I don’t care if my cake is a little rustic.  It still looks great.  But if you are a perfectionist, you will be pleased to make the tops of the cakes flat, I’m sure.) This makes the cake even.

Divide the buttercream into thirds.  Place one layer on a cake plate.  Put a few pieces of wax or parchment paper underneath to keep the plate clean while frosting.

Spread one third of the frosting on cake.  Repeat with 2nd layer. Place the third layer on the cake and form a very thin layer frosting on the top and sides of the cake.

Remove the wax/parchment paper.

I do hope that you try it for your next special occasion or just to celebrate any day in your life.

TIPS:

Parchment paper can be a slippery dude.  To fit the paper for your pan.  Put the pan on the paper and trace the bottom of the pan with a pencil.  Cut out the shape with a scissors.  Butter the bottom of the pan and place the paper, pencil side down.  Then continue with the instructions.  In this cake, you are to butter and flour the paper and the sides of the pan.

I thought I’d throw in another of my tips.  I like to keep empty butter wrappers, especially of the butters that were left at room temperature.  I fold the wrappers in half and put them in a baggie in the frig.

Then, when I need to butter a pan, I find there is enough butter left on the wrap to do the trick and if there isn’t, I add a little more.  It makes for easy smoothing and I don’t get my hands all buttery.

This was a long one!  Thanks for sticking with me to the end.  I appreciate it.  I hope your life is full of celebrations.  And until we meet again, eat well, drink well and live well.


The Battle of Banana Muffins

Do you remember when muffins were considered so healthy?  Everyone is trying to stay away from carbs now, especially the gluten variety, so muffin recipes are not as common as they were.  I have gluten sensitivity and so I watch how much flour I ingest.  I love bread and pasta but I try to not overdo their consumption on a regular basis.  I will try to incorporate more gluten-free recipes in the future, but not today.

I have two Banana Muffin recipes to share in this post.  Both of them have olive oil in them instead of butter, that elevates them a little higher in the “healthy scale”.  I used to make Banana Muffins for husband on a weekly basis and they were low in sugar and fats but it’s been a while and I’ve forgotten the recipe.  No matter, if you are looking for a healthier alternative for a muffin the second recipe will do the trick.  It has no sugar, no butter and it has oatmeal.

The whole healthy eating subject is driving me pretty crazy lately.  There are so many theories out there and they are so contradictory and confusing.  It’s 2017 and we don’t have an exact science on what we should be eating.  There’s the protein, fat and few carb diet, vegetarian diet, the vegan one, the calories in – calories out diet, the fasting one, the intermittent fasting diet, the organic nutrient rich diet… Should I go on?  I’m all for eliminating processed foods.  Although, I don’t always count my frozen yogurt as processed… but it is.  Or my mayo… it is.  I try to keep everything on a wholesome and fresh scale but as you can see, I do make exceptions.  One thing I do know and that is SUGAR is the devil.  I can’t live with it and I can’t live without it.  I just know that the less sugar I consume, the better I feel.

I am a little late starting my resolutions this year.  I usually try to start on the first or second.  And yes, they don’t last more than one month if I’m lucky.  This year, I am trying to really prepare myself for the long haul and so I am researching, planning and getting it together before I start.  I’m, also, being a little more gentle with myself and not going full speed ahead.  I’ll let you know how it goes.  How are your resolutions going?  Do you have any?  Leave me a comment.  Maybe we can help each other succeed.  Meanwhile, see if you like these muffins.

Best Ever Banana Muffins adapted from FOOD.com

Ingredients

3 ripe Bananas

1 1/2 cups unbleached Flour

1 tsp. Baking Powder

1 tsp. Baking Soda

1 1/2 cups Sugar

1/2 tsp. Salt

1/3 cup Olive Oil

1 Egg, slightly beaten

Preheat the oven to 375 degrees.  Grease a 12 muffin pan.

Mash the Bananas with a fork and incorporate them into the eggs with a whisk.

Add the Sugar and stir in.     Add the Olive Oil and stir.

Add Flour and blend.

Fill the muffin tins and bake for 20 minutes.

Maple-Sweetened Banana Muffins from cookieandkate.com

Ingredients

1/3 cup Extra Virgin Olive Oil

1/2 cup Maple Syrup

3 Eggs at room temperature

3 ripe Bananas

1/4 cup Milk

1 tsp. Baking Soda

1 tsp. Vanilla Extract

1/2 tsp. Salt

1/2 tsp. Cinnamon

1 3/4 cups White Whole Wheat Flour or Regular Whole Wheat Flour

1/3 cup Old-Fashion Oats, plus more for sprinkling on top

1 tsp. Turbinado Sugar or granulated Sugar, for sprinkling on top

Preheat oven to 325 degrees.  Grease 11 cups of your muffin tin.

In a large bowl, beat the Olive Oil and Maple Syrup together with a whisk.

Lightly beat Eggs.  Add Bananas and whisk well. Mix in Milk, followed by the Baking Soda, Vanilla Extract, Salt and Cinnamon.

Add the flour and oats to the bowl and mix with a large spoon, just until combined.

Divide the batter evenly between the 11 muffin cups, filling each cup about two-thirds full. Sprinkle the tops of the muffins with a small amount of oats (about 1 tablespoon), followed by a light sprinkling of sugar (about 1 teaspoon).

Bake muffins for 23 to 25 minutes, or until a toothpick inserted into a muffin comes out clean.

Place the muffin tin on a cooling rack to cool.

         vs.      

Best Ever Banana Muffins have 249 Calories, 7.6 g. of Fat, 43 g. of Carbs, 3.4 g. of Protein per muffin.

Maple Sweetened Banana Muffins have 233 Calories, 8.8 g. of Fat, 35.7 g. of Carbs, 5.3 g. of Protein per muffin.

As you compare the nutritional values of each recipe, they are pretty much the same.   Here is where the argument of healthy eating comes in.  The Maple Sweetened Banana Muffins, in my opinion, are healthier because of the whole grains and the absence of sugar.  Maple Syrup doesn’t lower the grams of sugar in a recipe but, in my opinion, is healthier because it is not as processed.  They both have olive oil which brings a healthier aspect to both.  Hope you try them and leave me a comment.

Happy New Year!  Good luck on your resolutions and remember to eat well, drink well and live well.